You've bought a domain name and also an email address associated with that domain. Great! Now what? The two things you'll need to do are associate your new domain name with your website, and get your domain "Verified". Why verify your domain? The primary reason for OwnerRez users is so that your email address will also be verified. Once your domain has been verified, any emails associated with are automatically verified.
When you send emails to guests from OwnerRez -- whether automatically on direct bookings, triggers, or manually via Email This Guest -- there are certain requirements to minimize filtering by spam filters. One of the requirements is the OwnerRez email is only meant for transactional email between you and a specific guest, related to an inquiry, quote, booking etc. OwnerRez is not designed for mass mailings. (For newsletter blasts to many guests at once, we recommend a dedicated newsletter tool like MailChimp -- use the Email List report to dump out a mailing list you can import into any of those tools.)
Another of the big requirements is the sending email address. By default, if you haven't provided us with a verified email, when we send email it'll come FROM your OwnerRez (@inquiryspot.com) email address with a REPLY-TO set to your account email.
We have to do this for spam purposes -- if we sent directly FROM your email address without being authorized, that'd be a spam flag.
This accomplishes the underlying goal -- when the guest hits reply the message will come back to you -- but it can show some "on behalf of" headers in the guest's email client.
To fix that, you need to:
- Own a domain
- Verify that domain
- Use an email address at that domain.
If you own your own domain, say acmevacations.com, you can set DNS records that verify us as a sending server. Once you do that, we'll switch over to sending directly FROM your verified email address -- say bookings@acmevacations.com. Of course your domain will be different, and you can pick any prefix, like your name.
To begin the process, go to Settings > Verified Email Domains.
https://app.ownerrez.com/settings/verifieddomains
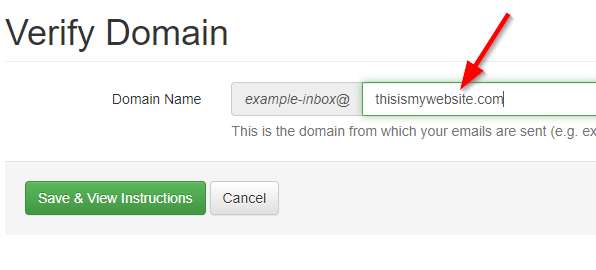
On that page, click the "Verify Domain" button. On the next page (as shown below) enter your website name in the field provided. Make sure there are no spaces at the beginning or end. Also make sure you don't include any http, www, or other characters.
Then click the green "Save and View Instructions" button. The next screen will look like this:
The easiest way to get this taken care of is to go to the company where you registered your domain name (GoDaddy, NameCheap, Bluehost, HostGator) and get on their live chat feature. Once there, tell them you're trying to verify your domain. Click on the little copy icon (shown above with the red arrow) and paste that into the chat feature. Normally they are very helpful and will do all of this for you.
Need a video walk-thru of the process? Here's additional info for those whose domains are registered on GoDaddy, Namecheap or with Google:
https://www.ownerrez.com/support/articles/verified-email-setup-godaddy
https://www.ownerrez.com/support/articles/verified-email-setup-namecheap
https://www.ownerrez.com/support/articles/verified-email-setup-google-domains
WiX
If you have your DNS and email hosted by WiX, you may have to do the configuration yourself:
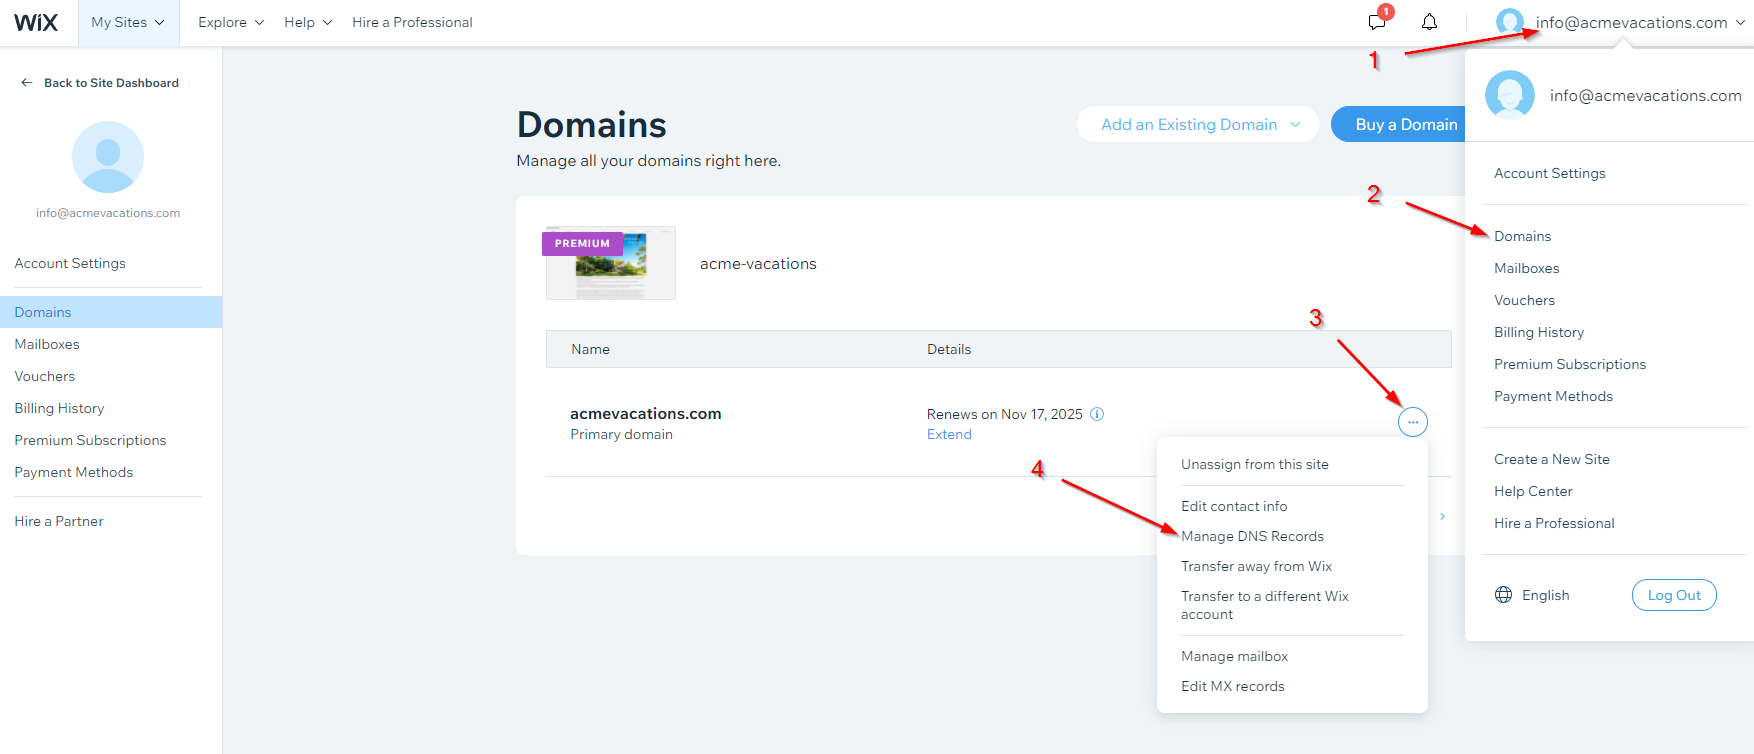
- Log into WiX, go to your Account Settings > Domains area. Click on the three seashells icon and go to the Manage DNS Records tool.

- Once you've accessed the Manage DNS Records page, add the CNAME and TXT records using the values shown in the instructions for your specific domain. Here's an example (your values will be different).
 When you go to add the CNAME, WiX may throw up a warning about "Editing or deleting your domain’s default A or CNAME records may cause your site to go offline" -- that's an extra precautionary message, but in this case you should only be adding a new record (not editing an existing one), so the warning doesn't apply.
Once your domain has been verified, any email that is associated with your domain will also be verified. (Just remember, the email has to end with your website info, like "bookings@thisismywebsite.com".
If you have questions or are having difficulty, contact us at help@ownerreservations.com for assistance in getting Verified Domain and Email configured for your OwnerRez account.
You can usually set up web mail as an additional service from your domain registrar, or you can use a large commercial service like G Suite for email addresses from your domain.
With a web mail provider like FastMail or Gmail, they don't authorize us to send, so we have to use the REPLY-TO method. That can lead some filters to identify your email as spam anyway.
On a related note, you set up an individual email address per property or property group using the Settings > Theming area. The Verified Sender process is the same for those as well.


