Recording owner payouts in the OwnerRez Property Management premium feature and then sending them through your Quickbooks integration can help automate your property management operations. Before you proceed with this article, we recommend that you review both the Property Management Overview and the Quickbooks Overview support articles for a thorough background.
Using the method described in this support article requires users to have an active QuickBooks account (QuickBooks Online, not QuickBooks Desktop) connected to OwnerRez, which you can connect using our QuickBooks setup and connecting process.
Owner payouts have been around for a long time, but they are often less understood and less utilized compared to statements and expenses, which tend to get more attention. Payouts are a record of the actual money transferred to the owner, while a statement indicates what the owner is entitled to receive. Although they sound similar, they are not the same.
For example, an owner might have a negative statement for a particular month. Instead of the owner sending a check to cover this negative amount, you may choose to carry it over to the next month. If the following month, the owner has a positive statement; the owner payout will reflect both the negative and positive statements combined.
Record Owner Payouts
Follow the instructions in our Owner Payouts support article.
Send Owner Payouts to QuickBooks
You can push owner payouts directly into QuickBooks as bills or checks. This means that you can use the tools in QuickBooks, like the Checks To Print queue or Pay Bills Online feature, to send money to all your owners quickly after recording multiple payouts.
This tool can also be found in the PM > Owner Payouts area above the Payouts grid. You'll see a "Send to QuickBooks" button that will either be enabled or disabled depending on whether you have a QuickBooks account connected to OwnerRez. To be clear, this only works with QuickBooks Online, not QuickBooks Desktop, and it has to be an active connected QuickBooks Online account which you can connect using our QuickBooks setup and connecting process.
The first time you click the button, OwnerRez will show you a configuration page where you'll need to map some options.

The "As Of Date" field allows you to set the starting date for when payouts should be pushed across to QuickBooks. After all, you probably don't want to push old payouts if the money for those payouts has already been sent. You can also specify whether you want to create Checks or Bill records in QuickBooks. If you want to print checks, use the "Check" type. At the bottom, you'll need to map the owner in OwnerRez to the vendor or customer in QuickBooks. This will allow OwnerRez to know what vendor or customer name to use when creating the check or bill in QuickBooks. When you're done configuring everything, click Save, and you'll be ready to go.
After configuration is over, you'll see the actual page to send payouts to QuickBooks, and it will look and act like all of our other batch pages.

The page works in two stages. First, you'll use the top options to find and show payouts that need to be sent to QuickBooks. Then, after seeing the payouts, you can select or confirm the ones to send, and OwnerRez will immediately push those payouts into your QuickBooks Online account as checks or bills. Let's step through the process...
Go ahead and click the Show Payouts button. By default, it will show any payouts that were never sent to QuickBooks in the past for all owners and for all dates back to the starting "As Of Date" you selected in the configuration area. The payouts will show right below that on the same page.
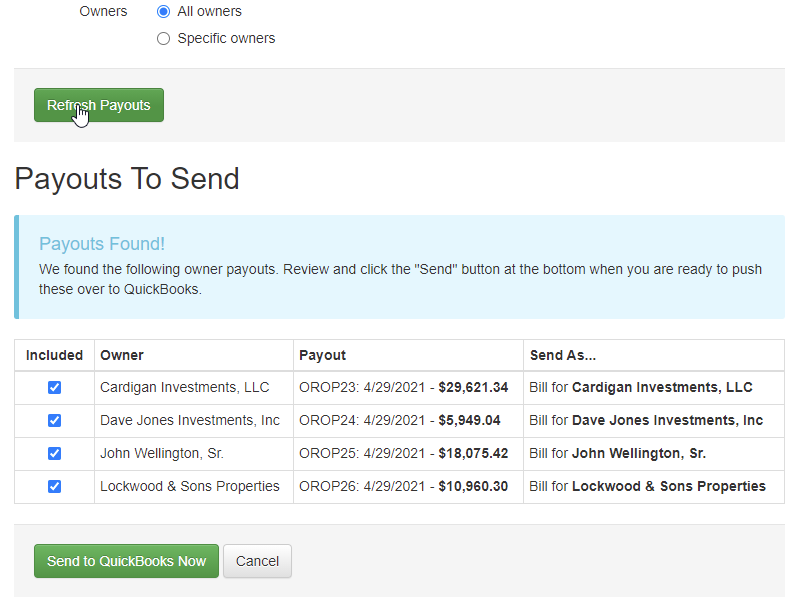
By default, all payouts will be selected, but you can de-select any that you don't want to send across to QuickBooks. If you need to change the criteria, simply do that at the top and click the "Refresh Payouts" button. The payouts will reload at the bottom, and you can re-confirm the selection.
When you have the group of payouts showing and selected that you want to send across, click the bottom "Send to QuickBooks Now" button, and OwnerRez will create check or bill transactions in QuickBooks while you wait.
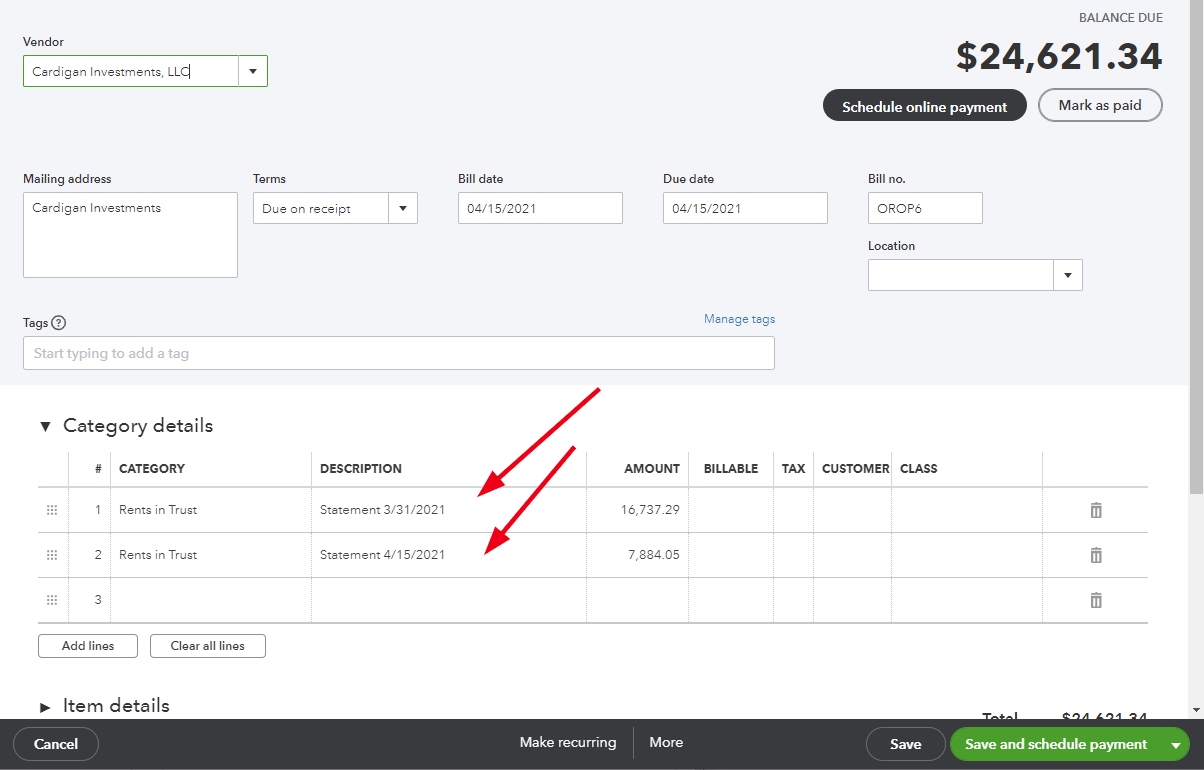
You can double-check your work by jumping into QuickBooks and clicking on the Expenses menu. You'll see the check or bills that OwnerRez just sent over.

Drill into one of those check or bill transactions, and QuickBooks will show the details inside. Notice that if the payout is for multiple statements, both statements are referenced with the correct amounts.
After your payouts are in QuickBooks, you can use the Checks To Print or Pay Bills Online queues in QuickBooks to send money to the owners quickly, greatly eliminating the time to enter and send owner payouts.